Integrating Django with AI and LLMs: Building AI-Powered Web Apps
Artificial Intelligence (AI) and Large Language Models (LLMs) have transformed web applications by enabling intelligent automation…


Artificial Intelligence (AI) and Large Language Models (LLMs) have transformed web applications by enabling intelligent automation, chatbots, content generation, and personalized recommendations.
Django, being a powerful web framework, seamlessly integrates with AI models to build scalable AI-powered applications.
In this guide, we’ll explore how to integrate Django with AI and LLMs by covering:
✅ Choosing an AI/LLM Provider (OpenAI, DeepSeek, Hugging Face, Local Models)
✅ Setting Up Django for AI Integration
✅ Building an AI Chatbot with OpenAI’s GPT API
✅ Deploying a Local LLM using LangChain and Hugging Face
✅ Optimizing AI Workflows in Django
By the end, you’ll be able to build AI-powered Django applications that interact with LLMs efficiently.
1️⃣ Choosing the Right AI/LLM Provider
Before integrating AI into Django, you need to decide whether to use:
🔹 Cloud-Based LLMs — OpenAI’s GPT, DeepSeek, Claude, Gemini, etc.
🔹 Self-Hosted Models — LLaMA, Mistral, GPT-J, or any Hugging Face model.
🔹 Hybrid Approach — Use cloud LLMs for complex tasks and local models for cost efficiency.
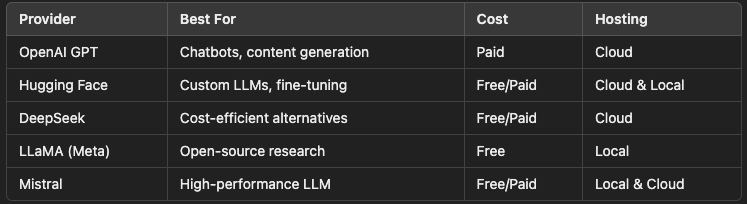
✅ Use Cloud LLMs if you need quick setup and high accuracy.
✅ Use Local Models for privacy, cost control, and offline availability.
2️⃣ Setting Up Django for AI Integration
To integrate AI, install necessary dependencies:
pip install openai langchain transformers torch django-rest-framework🔹 openai – For GPT-based models (like ChatGPT).
🔹 langchain – For local AI models and AI pipelines.
🔹 transformers & torch – For running Hugging Face models locally.
Modify INSTALLED_APPS in settings.py:
INSTALLED_APPS += ["rest_framework"]3️⃣ Building an AI Chatbot in Django with OpenAI’s GPT API
Step 1: Configure OpenAI API Key in Django
Set your OpenAI API key in settings.py:
import os

OPENAI_API_KEY = os.getenv("OPENAI_API_KEY")
Ensure you have an .env file:
OPENAI_API_KEY=your-openai-api-keyLoad it in Django:
pip install python-dotenvModify settings.py:
from dotenv import load_dotenv
load_dotenv()
Step 2: Create a Django API View for the Chatbot
from django.conf import settings
from django.http import JsonResponse
import openai

def chat_with_gpt(request):
    user_input = request.GET.get("message", "")

    if not user_input:
        return JsonResponse({"error": "No message provided"}, status=400)

    openai.api_key = settings.OPENAI_API_KEY

    response = openai.ChatCompletion.create(
        model="gpt-4",
        messages=[{"role": "user", "content": user_input}]
    )

    return JsonResponse({"response": response["choices"][0]["message"]["content"]})
4️⃣ Running a Local LLM in Django Using LangChain & Hugging Face
Step 1: Download a Hugging Face Model
If you want to run an AI model locally, download it:
pip install transformersDownload Mistral-7B (or any other model):
from transformers import pipeline

qa_pipeline = pipeline("text-generation", model="mistralai/Mistral-7B")
Step 2: Create an API for the Local Model
Modify views.py:
from django.http import JsonResponse
from transformers import pipeline

qa_pipeline = pipeline("text-generation", model="mistralai/Mistral-7B")

def local_ai_view(request):
    user_input = request.GET.get("message", "")
    if not user_input:
        return JsonResponse({"error": "No message provided"}, status=400)

    response = qa_pipeline(user_input, max_length=100, do_sample=True)
    return JsonResponse({"response": response[0]["generated_text"]})
✅ Now, your Django app runs a local LLM for AI responses!
5️⃣ Optimizing AI Workflows in Django
To improve efficiency and performance:
1. Use Celery for Background AI Processing
AI tasks can take time. Offload them using Celery.
pip install celery redisModify celery.py:
from celery import Celery

app = Celery("ai_project", broker="redis://localhost:6379/0")

@app.task
def process_ai_request(message):
    response = openai.ChatCompletion.create(
        model="gpt-4", messages=[{"role": "user", "content": message}]
    )
    return response["choices"][0]["message"]["content"]
Now, call the task asynchronously:
task = process_ai_request.delay("Hello AI!")✅ This prevents AI requests from blocking your Django app.
2. Use Redis to Cache AI Responses
Avoid unnecessary API calls by caching responses.
pip install django-redisModify settings.py:
CACHES = {
    "default": {
        "BACKEND": "django_redis.cache.RedisCache",
        "LOCATION": "redis://127.0.0.1:6379/1",
        "OPTIONS": {"CLIENT_CLASS": "django_redis.client.DefaultClient"},
    }
}
Modify the chatbot function:
from django.core.cache import cache

def chat_with_gpt(request):
    user_input = request.GET.get("message", "")
    cache_key = f"chat_response:{user_input}"

    if cached_response := cache.get(cache_key):
        return JsonResponse({"response": cached_response})

    response = openai.ChatCompletion.create(
        model="gpt-4", messages=[{"role": "user", "content": user_input}]
    )

    chat_response = response["choices"][0]["message"]["content"]
    cache.set(cache_key, chat_response, timeout=600)  # Cache for 10 minutes

    return JsonResponse({"response": chat_response})
✅ Now, repeated AI requests won’t hit the API every time!
🚀 Conclusion
By integrating Django with AI and LLMs, you can build chatbots, recommendation engines, document analysis tools, and AI-powered search engines.
✅ Use OpenAI for cloud-based AI solutions.
✅ Run local LLMs with Hugging Face for privacy.
✅ Optimize AI workflows using Celery and Redis.
AI in Django opens up limitless possibilities — what AI-powered Django app will you build next? 🚀 Let me know in the comments!